
I’ll never forget the first time I made Halloween Pumpkin Tarts with my children, Julia and Max. It was one of those crisp October days when the leaves danced in fiery colors, and the air held the promise of Halloween. My husband, Mark, had just returned from our local pumpkin patch with an armful of perfectly round, bright orange pumpkins. I remember he walked in with a grin, his plaid shirt speckled with dirt from his hunting adventure among the pumpkins. As he set them on our kitchen table, Julia’s eyes lit up with excitement, while Max proclaimed he wanted the biggest one for carving a jack-o’-lantern.
Together, we decided to create something new that year. Instead of just carving pumpkins or making the traditional pumpkin pie, we opted to bake delicious little tarts, each personalized with whimsical decorations that Julia and Max could help with. As we gathered our ingredients, laughter filled the kitchen. My children squealed with delight as they rolled out the pie crust and cut it into perfect little circles. We stirred the mixture of pumpkin purée and sweet spices, filling the room with a sweet aroma that felt like a warm hug.
It became a cherished memory: us, covered in flour, with little fingers sneaking tastes of the sweet filling, working side by side to create something beautiful and delicious. These Halloween Pumpkin Tarts became a symbol of our family’s creative spirit—fun, playfulness, and love—all wrapped up in a flaky crust and creamy filling. Each tart was not just a treat; it was a reminder of the warmth we felt together in our kitchen on that autumn day.
Why Make This Recipe
Halloween Pumpkin Tarts are a delightful twist on traditional pumpkin pie, serving as the perfect bite-sized treat for any Halloween gathering. Who doesn’t fondly recall the experience of snuggling up in cozy sweaters and indulging in fall-themed treats? This recipe allows you to share that experience with others. These tarts are not only adorable but bursting with flavor—sweet pumpkin, warm spices, and just the right amount of creamy goodness.
Imagine having friends over for a pumpkin-carving party, or perhaps you want to sweeten your child’s classroom Halloween celebration. Bringing these Halloween Pumpkin Tarts will surely earn you sealed envelopes of best treat awards! Plus, they’re easy enough for kids to assist in making, making it a fun family bonding activity. After all, nothing compares to the joy of creating something scrumptious together.
Are you ready to embark on this flavorful adventure with me? Let’s dive into the delicious world of Halloween Pumpkin Tarts!
How to Make Halloween Pumpkin Tarts
Ingredients:
- 2 pie sheets
- 1 tbsp unsalted butter (butter wash for decorations only)
- 1 cup pumpkin purée
- 1/2 cup sweetened condensed milk
- 1 egg
- 1 tsp pumpkin pie spice
- 1/2 tsp cinnamon
- 1/8 tsp salt
- 1/4 cup sugar
- 1 tsp cinnamon
Directions:
- Preheat the oven to 425°F. Allow the pie crust to thaw while you prepare the filling.
- In a mixing bowl, combine the pumpkin purée, sweetened condensed milk, egg, pumpkin pie spice, cinnamon, and a pinch of salt. Mix until everything is well combined and smooth. You can use a whisk or a hand mixer for this part.
- Roll out the pie sheets on a floured surface and cut them into circular shapes. I like to use a large cookie cutter or the rim of a drinking glass for this.
- Press each circle into the muffin holes, ensuring they fit snugly. This is where my kids love to help; they enjoy pressing the dough into the pan just right!
- Scoop the pumpkin pie filling into each muffin cup, filling them to the top of the crust. Remember not to overfill—the filling will puff up a bit while baking.
- Bake in the oven at 425°F for 15 minutes. After that, reduce the temperature to 350°F and continue baking for another 15 minutes. Your kitchen will soon smell like a dream!
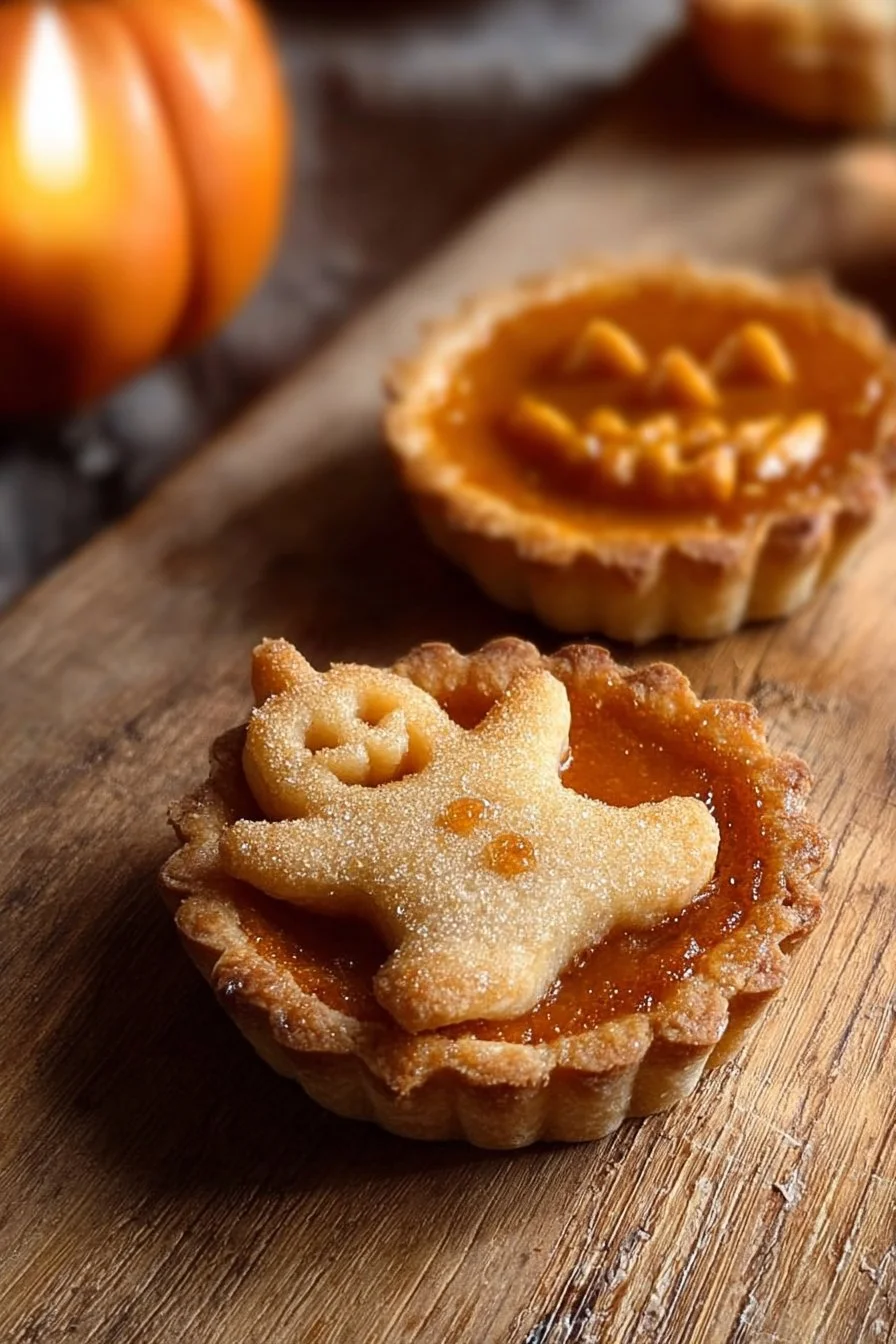
- While the tarts are baking, use any leftover pie crust to create decorations. I love grabbing cookie stamps or a small knife to make fun shapes like pumpkins or leaves. Simply brush them with butter and sprinkle with cinnamon sugar, then bake at 450°F for 6 to 8 minutes until golden.
- Once the tarts are done, add the baked decorations on top for that extra flair. Trust me—this little touch makes them even more delightful!
How to Serve Halloween Pumpkin Tarts
To serve your Halloween Pumpkin Tarts beautifully, arrange them on a festive platter, perhaps garnished with some autumn leaves or scattered candy corn for that extra Halloween spirit. They’re fantastic for parties or as a dessert option at family dinners. You can even drizzle a little caramel or chocolate sauce on the side for a decadent twist.
If your tarts last beyond the party (which is rare in our home), you can dust them with powdered sugar before serving to make them festive!
How to Store Halloween Pumpkin Tarts
These tarts are best enjoyed fresh, but if you happen to have leftovers, you can store them in an airtight container in the refrigerator for up to three days. Just be sure to place parchment paper between layers to avoid sticking.
If you want to prepare them ahead of time, you can also freeze the tarts before baking. Just wrap them tightly in plastic wrap and foil, and they will stay fresh for up to three months. To bake from frozen, just pop them directly into the oven and add a few extra minutes to the baking time.
Tips to Make Halloween Pumpkin Tarts
- Experiment with spices: If you prefer, add a dash of nutmeg or ginger to the filling for an extra kick.
- Use fresh pumpkin: If you love the challenge, roasting and puréeing a fresh pumpkin can add an incredible depth of flavor to your tarts.
- Involve the kids: This is a wonderful recipe for getting kids involved in the kitchen. Let them roll the dough or sprinkle the decorations!
- Make mini versions: For bite-sized fun, you can also make smaller tarts. Just adjust the baking time to a few minutes less.
- Try different decorations: Get creative—use cookie cutters in various festive shapes, or even sprinkle nuts or chocolate chips on top before baking for a delicious surprise.
Variation
For a fun twist, consider making a chocolate crust instead of the regular pie crust for a richer flavor. Adding a layer of chocolate ganache at the bottom of the tart can also create a delightful contrast to the pumpkin filling.
You could also swap the pumpkin for sweet potato or butternut squash for a different taste while keeping that rich, velvety texture.
FAQs
Q1: Can I use canned pumpkin instead of fresh pumpkin?
A1: Yes, using canned pumpkin purée is an easy and convenient option! Just ensure it’s pure pumpkin, not pumpkin pie filling.
Q2: How long do these tarts take to bake?
A2: Total baking time is about 30 minutes, with an initial high temperature followed by a lower one to set the filling.
Q3: Can I make these tarts gluten-free?
A3: Absolutely! Use gluten-free pie crusts available at most grocery stores. The filling is naturally gluten-free.
Creating Halloween Pumpkin Tarts has become a delightful tradition in our household, one brimming with love and laughter. I hope you have as much joy making them with your friends and family as I do. They truly capture the essence of autumn and the spirit of togetherness. Happy baking!
Halloween Pumpkin Tarts
Ingredients
Method
- Preheat the oven to 425°F. Allow the pie crust to thaw while you prepare the filling.
- In a mixing bowl, combine the pumpkin purée, sweetened condensed milk, egg, pumpkin pie spice, cinnamon, and a pinch of salt. Mix until everything is well combined and smooth.
- Roll out the pie sheets on a floured surface and cut them into circular shapes.
- Press each circle into the muffin holes, ensuring they fit snugly.
- Scoop the pumpkin pie filling into each muffin cup, filling them to the top of the crust but not overfilling.
- Bake in the oven at 425°F for 15 minutes.
- Reduce the temperature to 350°F and continue baking for another 15 minutes.
- While the tarts are baking, use any leftover pie crust to create decorations. Brush them with butter and sprinkle with cinnamon sugar, then bake at 450°F for 6 to 8 minutes until golden.
- Once the tarts are done, add the baked decorations on top.