
I love turning every moment in the kitchen into a fun memory. In our cozy home, filled with laughter and the smell of home-cooked meals, cooking is my canvas, especially with my two lively kids, Mia and Jack. Whether we’re making after-school snacks or festive Halloween treats, our kitchen becomes a playground of flavors and fun.
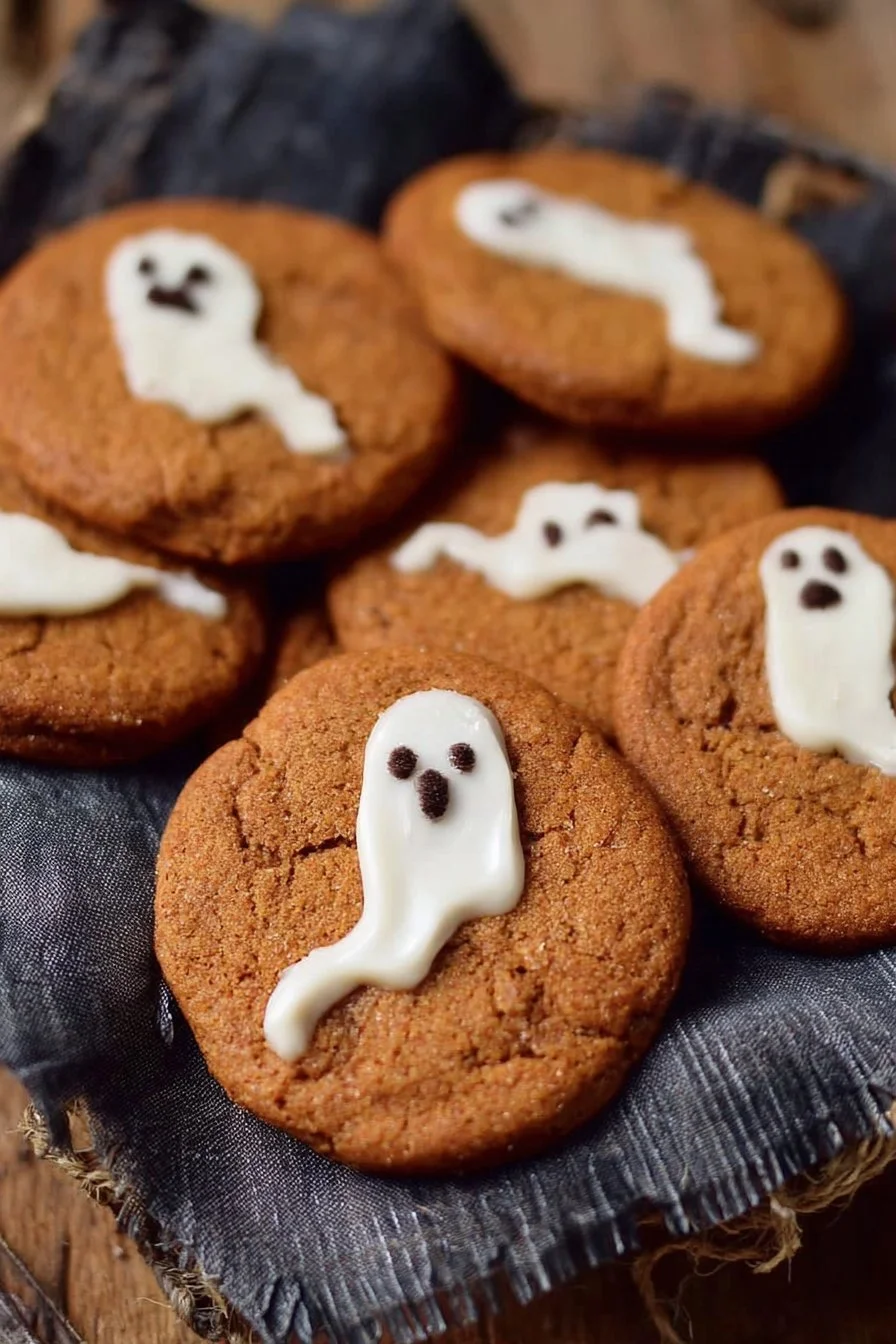
This fall, we’re making my signature Spooky Ghost Brown Butter Pumpkin Cookies. They’re not just any fall treat. The rich flavors of brown butter and pumpkin, paired with playful ghost decorations, make them perfect for Halloween gatherings or an afternoon with the kids. Every bite is a mix of flavor, fun, and family memories.
Why Make This Recipe
Amelia chose to make Spooky Ghost Brown Butter Pumpkin Cookies for several reasons. First and foremost, the flavors of brown butter and pumpkin evoke the essence of autumn. They provide comfort, warmth, and a hint of nostalgia, reminding her of cozy family gatherings during the fall festival season. Secondly, the playful ghost shapes created with white and black candy melts add just the right touch of fun to the cookies, making them a perfect project for her kids.
Cooking together fosters creativity, patience, and teamwork, embedding life lessons in each sprinkle of flour and dollop of icing. Plus, Halloween treats don’t have to be purely sugary; with a little twist, Amelia infuses her family’s favorites into each cookie while maintaining a balance between indulgence and health. These cookies are made with simple, wholesome ingredients, allowing her to feel good about what her children are enjoying.
How to Make Spooky Ghost Brown Butter Pumpkin Cookies
Making Spooky Ghost Brown Butter Pumpkin Cookies is a fun and interactive process. Amelia’s children love to help out, from measuring ingredients to decorating the final product. Anyone can follow along, whether you’re a seasoned baker or trying your hand for the first time.
Ingredients
To create these delightful cookies, gather the following ingredients:
- 1 batch of Brown Butter and Maple Chewy Pumpkin Cookies by Butternut Bakery
- White chocolate (Ghirardelli melting wafers work well)
- Black candy melts
- Piping bag (or a ziplock bag if you don’t have one)
- Medium cookie scoop
- Light colored baking pans
Directions
- Bake the Cookies: Begin by preparing a batch of Brown Butter and Maple Chewy Pumpkin Cookies as outlined in the recipe from Butternut Bakery. Allow the cookies to fully cool on the baking sheets.
- Melt the White Chocolate: While the cookies cool, melt your white chocolate in a microwave-safe bowl. It’s crucial to melt it slowly. Stir it every 30 seconds until creamy, avoiding any overheating.
- Create the Ghost Shape: Once the cookies are completely cool, take a medium cookie scoop and spoon a small dollop of the melted white chocolate onto the center of each cookie. Using the back of a small spoon, apply light pressure and slowly drag the spoon to create a ghost shape. If you’re new to this, practicing on parchment paper first can help you perfect your technique before working with the actual cookies.
- Let it Harden: Allow the white chocolate to set on each cookie. This should take about 30 minutes—perfect timing for a little dance party with Mia and Jack while you wait!
- Melt the Black Candy Melts: Next, melt your black candy melts in a microwave-safe container. You can also use a double boiler if you have one. Pour the melted candy into a piping bag, or use a ziplock bag with a small corner cut off for piping.
- Decorate the Cookies: Use the black candy melts to pipe small dots for the eyes and mouth on each ghost. This is where the kids come in handy, adding their own spooky touches!
- Final Touches: Allow the candy melts to dry completely. Once hardened, your Spooky Ghost Brown Butter Pumpkin Cookies are ready to bring some festive spirit into your home!
How to Serve Spooky Ghost Brown Butter Pumpkin Cookies
These cookies make a perfect centerpiece for any autumn gathering. You can serve them on a decorative platter, surrounded by mini pumpkins and gourds, to add to the Halloween spirit. Amelia often sets up a cookie-decorating station at birthday parties or casual family get-togethers, where guests can enjoy creating their spooky designs.
Pair these cookies with a warm cup of hot chocolate for a cozy treat on chilly evenings or serve them at a Halloween party as a fun dessert option. The playful designs will be a conversational piece, bringing smiles to guests of all ages.
How to Store Spooky Ghost Brown Butter Pumpkin Cookies
Proper storage is essential to keep these cookies fresh and delicious. Place them in an airtight container at room temperature to maintain their flavor. They will stay fresh for up to five days. If you want to keep them longer, Amelia recommends freezing them. Just ensure each cookie is wrapped individually in plastic wrap and stored in a freezer-safe bag. They can last up to three months in the freezer. Simply thaw at room temperature for a few hours before serving!
Tips to Make Spooky Ghost Brown Butter Pumpkin Cookies
- Use Real Pumpkin: For a richer flavor, consider using homemade pumpkin puree instead of canned pumpkin. Roast fresh pumpkins, blend, and use it in the cookie dough.
- Mix Your Flours: Experiment with half all-purpose flour and half whole wheat flour for a more nutritious version. The texture remains delightful while adding a slight nutty flavor.
- Kid-Friendly: Let your children be creative with the ghost decorations. They can add colored sprinkles or candy eyes for more fun!
- Don’t Rush the Cooling: Ensure the cookies cool completely before adding the white chocolate. This way, the decorations will not melt off.
Variations
While the classic Spooky Ghost Brown Butter Pumpkin Cookies are delightful, you can add your own twist. Think about swapping out the white chocolate for dark chocolate for a richer taste or even using a flavored candy melt, like caramel, to ramp up the sweetness. Also, mix in some chopped nuts or dried fruits like cranberries for an exciting flavor contrast.
FAQs
1. Can I make these cookies vegan?
Absolutely! You can substitute the eggs with flax eggs (1 tablespoon of ground flaxseed mixed with 2.5 tablespoons of water), and use dairy-free alternatives for the butter and chocolate.
2. What if I don’t have a piping bag?
No worries! A ziplock bag works just as well. Just cut a small tip off one of the corners to create a makeshift piping bag.
3. Can I make the cookies ahead of time?
Yes! You can bake the cookies and decorate them a few days before your event. Just store them as directed and enjoy!
Amelia West’s Spooky Ghost Brown Butter Pumpkin Cookies are not just a fun treat for Halloween; they embody the spirit of family and creativity within the kitchen. Whether you’re baking with little ones or surprising friends at a gathering, these cookies bring seasonal cheer and endless smiles. So roll up those sleeves, invite loved ones into your kitchen, and let the memories (and delicious scents) flow freely as you create these delightful ghostly treats!
Spooky Ghost Brown Butter Pumpkin Cookies
Ingredients
Method
- Prepare a batch of Brown Butter and Maple Chewy Pumpkin Cookies as outlined in the recipe from Butternut Bakery. Allow the cookies to fully cool on the baking sheets.
- Melt the white chocolate in a microwave-safe bowl, stirring every 30 seconds until creamy.
- Once the cookies are completely cool, use a medium cookie scoop to place a small dollop of the melted white chocolate onto the center of each cookie, shaping it into a ghost with a small spoon.
- Allow the white chocolate to set, approximately 30 minutes.
- Melt the black candy melts and pour into a piping bag or a ziplock bag with a small corner cut off.
- Pipe small dots for the eyes and mouth on each ghost using the black candy melts, allowing kids to add their own spooky touches.
- Allow the candy melts to dry completely before serving.