
There’s something magical about gathering in the kitchen with my children, just the three of us, and transforming ordinary ingredients into something extraordinary. It’s one of those crisp fall evenings, the kind where the air turns chilly and the leaves dance down from the treetops. I remember this particular night vividly. My son, Jake, and my daughter, Lila, buzzing with excitement from the impending Halloween festivities, were eager to help me prepare our special dinner that would delight their little friends at the upcoming party. I wanted to create a dish that would not only satisfy their tummies but also spark joy and laughter.
That’s when I whipped out the recipe for Witch Finger Breadsticks. To me, this isn’t just any recipe; it’s a playful creation that brings smiles to little faces and joy to hearts. The anticipation was palpable in our cozy kitchen as we put on our aprons, ready to craft what appeared to be grotesque yet utterly delightful breadsticks. The giggles that erupted as we shaped the dough into wiggly fingers are moments I treasure deeply. This recipe is not only a fun culinary adventure but also a perfect way to create lasting memories with my kids while we embrace the spirit of Halloween.
In the spirit of sharing, let me take you through the simple and captivating journey of making these Witch Finger Breadsticks. I assure you, they are easier to make than they look, and the kids will have a blast helping out.
Why Make This Recipe
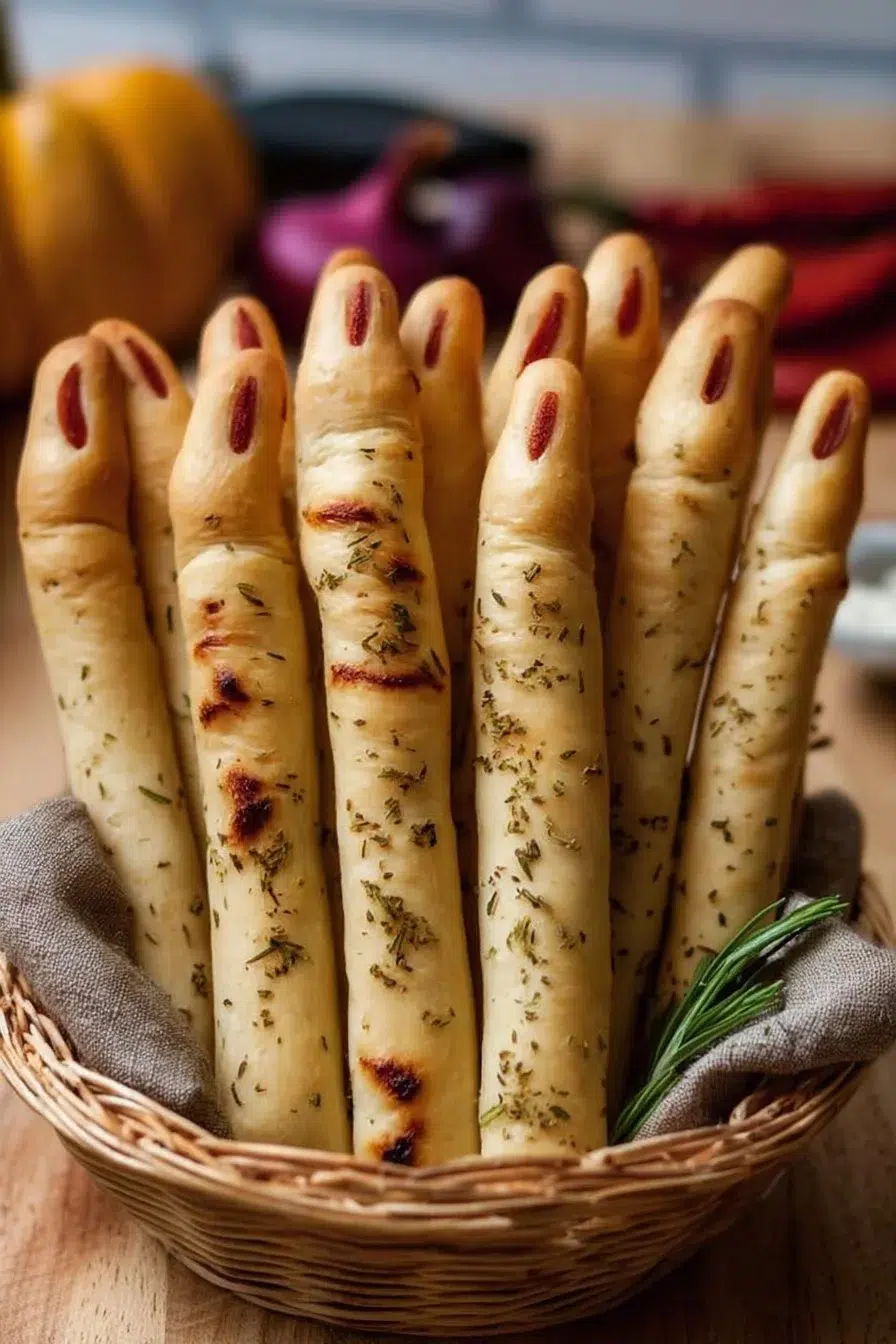
Witch Finger Breadsticks are a whimsical take on traditional breadsticks that not only serve as an entertaining dish but also bring a touch of spooky flair to your dinner table. Whether you’re hosting a Halloween party, a themed dinner night, or simply looking to add a bit of fun to your family meal, this recipe is a winner.
The beauty of Witch Finger Breadsticks lies in their simplicity. With just a few basic ingredients, you can create a playful dish that sparks creativity and fun at the dinner table. Kids and adults alike will enjoy shaping their own “fingers,” and the whole process becomes a delightful activity rather than just cooking. Plus, these breadsticks are deliciously warm and fluffy, with just the right amount of flavor from the spices and olive oil.
Every time I make these, I am reminded of the laughter my kids share during the preparation. It’s not just about the food; it’s about bonding and creating something together. With every twist and turn of the dough, we weave in stories and laughter, planting seeds of love in each finger-shaped breadstick. So gather your ingredients and let’s create some unforgettable memories with this Witch Finger Breadsticks Dinner Recipe!
How to Make Witch Finger Breadsticks
Ingredients
- Pizza Dough: 1 pound (you can either make it from scratch or grab a store-bought option)
- Almonds or Pumpkin Seeds: Use these as “nails” for the fingers
- Egg: 1 (beaten, for brushing the breadsticks)
- Salt: To sprinkle on top
- Olive Oil: 2 tablespoons (to add flavor and shine)
- Spices: Garlic powder, rosemary, or any favorite seasoning you wish
- Red Food Coloring: Optional, for a fun “bloody” touch
Directions
- Prepare the Baking Sheet: Start by preheating your oven to 375°F (190°C). Line a baking sheet with parchment paper — this prevents the fingers from sticking and makes cleanup a breeze!
- Roll the Dough: Take your pizza dough and flatten it out using a rolling pin. Roll it to about 1/4-inch thick.
- Cut into Strips: Use a sharp knife or pizza cutter to slice the dough into strips, roughly the width of your fingers (about 1 inch wide).
- Shape Each Stick: Now comes the fun part! Roll and twist each strip of dough into a finger shape. This is where the kids can get really creative. Make them long and wiggly or short and stout!
- Add Almonds or Pumpkin Seeds: Press an almond at one end of each breadstick to create the “nail.” If you’re using pumpkin seeds, they’ll also do a great job!
- Brush with Egg: Using a pastry brush, coat each of the shaped breadsticks with the beaten egg. This will give them a beautiful golden color while baking.
- Bake: Place the baking sheet in the oven and bake for 15-20 minutes or until the breadsticks are golden brown and cooked through.
- Cool and Serve: Once baked, allow them to cool for a few minutes. For an extra touch of delight, you can dab some optional red food coloring at the tip of each finger for a fun, spooky effect!
How to Serve Witch Finger Breadsticks
These Witch Finger Breadsticks make for an entertaining play on a traditional dinner roll. You can serve them as a fun cultural twist to a family meal, Halloween party, or spooky movie night. Pair them with a hearty bowl of marinara sauce or a delicious pumpkin soup — the warm flavors complement each other beautifully.
Kids absolutely love to dip! Create a “dipping station” with different sauces: marinara, garlic butter, or ranch dressing. The kids will enjoy experimenting, and it’ll add to the fun of the experience. Don’t forget to gather around the table as a family to share stories and laugh over your whimsical creation!
How to Store Witch Finger Breadsticks
If you happen to have any leftovers (though they tend to disappear quickly), it’s essential to store them properly. Place the cooled Witch Finger Breadsticks in an airtight container. They can stay fresh at room temperature for about 2-3 days. If you want them to last longer, consider refrigerating them, where they can be kept for up to a week.
To reheat, simply pop them into a preheated oven for a few minutes until they’re warm and crisp again. They are still quite delicious even a couple of days later, especially when heated up!
Tips to Make Witch Finger Breadsticks
- Get Creative: Let your kids get creative! Use cookie cutters to make different shapes or add other toppings like cheese or herbs to the dough for a flavor twist.
- Experiment with Seasonings: Don’t hesitate to sprinkle extra spices on your breadsticks. Rosemary, thyme, and garlic powder not only add flavor but also enhance the aroma while baking!
- Make Them Ahead of Time: You can make the dough a day ahead and shape it into fingers. Store them in the refrigerator and bake just before serving for a warm, fresh-out-of-the-oven treat.
Variations
While the classic Witch Finger Breadsticks recipe is fantastic on its own, there are fun variations you can explore as well. For a cheesy twist, you can incorporate shredded cheese into the dough before shaping. If you like a kick, add a bit of chili powder or cayenne pepper for a spicy touch.
You may also try adding sesame seeds or poppy seeds on top for added crunch and flavor. Transforming them into “witches’ warts” adds to the fun aesthetic!
FAQs
1. Can I use gluten-free pizza dough?
Absolutely! You can use gluten-free pizza dough to accommodate anyone with gluten sensitivities. Just follow the same instructions for shaping and baking.
2. How can I make the breadsticks more flavorful?
Add in your favorite spices to the dough, or sprinkle various seasonings on top before baking. Garlic powder and Italian herbs work wonderfully!
3. Can I freeze the Witch Finger Breadsticks?
Yes, you can freeze the uncooked shaped fingers on a baking sheet, then transfer to an airtight container. You can bake them directly from the freezer, though they may take a few extra minutes to cook through.
Cooking with my children not only means making delicious meals but also creating memories that last a lifetime. So, gather your kids, get your hands messy, and dive into the joy of making Witch Finger Breadsticks together. They make every dinner a delightful celebration of creativity and togetherness that I cherish deeply!
Witch Finger Breadsticks
Ingredients
Method
- Preheat your oven to 375°F (190°C) and line a baking sheet with parchment paper.
- Flatten the pizza dough to about 1/4-inch thick using a rolling pin.
- Slice the dough into strips, roughly 1 inch wide.
- Roll and twist each strip into a finger shape, making them as creative as possible.
- Press an almond or pumpkin seed onto one end of each stick to create a 'nail.'
- Using a pastry brush, coat each shaped breadstick with the beaten egg.
- Bake in the preheated oven for 15-20 minutes or until golden brown.
- Allow them to cool for a few minutes before serving. Optionally, add red food coloring at the tip of each finger.